Tuesday, April 30, 2013

Cutting, Conditioning & Transporting Flower Arrangements

 I love cut flowers.  I am glad this year I have enough to look at and to cut...which was the goal.  I, oftentimes, give cut flowers as gifts.  Let me preface, I am no expert on this..so if you have feedback, it's welcome but this is what I do.

 Below is an arrangement for my Mother-in-Law as a thank you.  She prefers white flowers but I did not have enough in bloom so her second choice is peach.  The below arrangement is my interpretation of peach (and what I had available for cutting).  I chose roses that were just about to open versus fully open so that it had a longer vase life.  If they are fully open, they won't live as long.   Also, put in spirea, bougainvillea, and split leaf philodendron.
If I know I am going to cut flowers, I make sure they are watered.  Yesterday, it rained so that took care of the watering.  I, typically, cut the flowers in the evening.  Try to do it in the morning or the evening, I believe one time of the day has more sugar and the other time, the flowers have more water.

I cut the flowers at an angle.  I, usually, put a can of Mountain Dew in the container.  I try to make sure there are no leaves inside the fluid of the vase because I think it causes fungus or bacteria or something.  I, also, like the color of Mountain Dew.  If I don't want it to be green, I use Sprite. DO NOT USE DIET SODA.  I made that mistake only once.  But the sugared sodas have citric acid and sugar and a bunch of other stuff that prolongs vase life.

I, then, condition the flowers (or at least that is what I believe I am doing).  Ideally, you want to put them in the fridge overnight.  In this case the arrangement was too big.  So I put them in a dark bathroom.  I am certain there are books on the subject but I know you want to keep them in a dark cool place after cutting.  Preferably, overnight.

Now, how did I transport them in my car?  I usually use a bucket.  In this case a five gallon bucket and I put a garbage bag in it.


This can be placed in a seat and belted.

I put the arrangement in the bucket, but how do you keep it from bouncing around in the bucket.

I usually use left over styrofoam.  You can use most things of bulk but this has been the most convenient   Remember not to leave them in the heat (ie run the AC) because like most things a hot car will kill anything.

Monday, April 29, 2013

Butterfly garden...for the Museum

Sorry for the double post, just putting stuff up for the museum to consider.  So feel free to ignore this one..just helping them with a butterfly garden..
Bamboo edging going horizontal.....as close as I could make it.  I am using the trial version.
Threw in some wildflowers in and put a sundial to represent the bird bath

Sunday, April 28, 2013

Installing a very simple automatic watering system...DIY

You want a very easy way to have an automatic watering system.  It isn't difficult and it's as customized as you want to make it.  Below is something I bought that I don't think worked properly but I have a few timers...more about that in a minute.
First thing you want is a water timer.  I have seen ones that have 1, 2, or 3 outlets for hoses for a particular area.  This particular one only has one but they all work pretty much the same.  Orbit makes them.  You can find them online or at your usual places like Wal-Mart, Lowes and Home Depot.

They are battery powered so need to worry about electricity.

You have to program it.  The way this works is you hook this to your spigot and you leave the spigot on.  When the timer is set to go off, it releases the valve and water is allowed to pass through a hose.  The initial set up is fairly easy.  You set when, how long, how often, etc.  If you want the thing to turn on, you just press Manual, if you want a rain delay, you just press the + button, and if you want it not to go off, you can set it to off or turn off the spigot.

Set the time

\
Set what time of the day you want it to go off


How long you want it to go water.

How often you want it to go off

You will need a lead hose unless you attach it directly to the wall, but I find a short lead hose works fine.

In this particular case, I am water roses that in a straight line and relative proximity.  So I am opting to use a soaker hose and sod staples.  But you may opt to just use a regular sprinkler...it can be as simple as you want.

Sod staples to keep the soaker hose in place

This is the rose bed getting irrigated.


Next I ran a hose from the timer to the roses

I discover that initial timer had a faulty valve..I bought it refurbished.  A couple of things here.  You don't want leaks from the spigot or the top of the timer.  Remember the trick is to leave the hose running but you don't want a leaky mess.

This one a tiny leak but nothing major.  A good spigot and lead hose would remedy it.  I put a hose fitting on this one because that is what I had available and it seemed to work.  If it leaks out the other end, that isn't so bad..since it will only do that when the water is running through the hoses.

Since I am using two station, the other station I ran a hose to the other rose bed along the drive.  This hose is approx 150 feet, but the distance it really needed to travel is less than 100 feet.

I already had a soaker hose in place with this rose bed so I just attached the hose

Roses are prone to black spot so I opted for a soaker hose over a sprinkler

Unlike the other soaker hose, this one is rigid, the other hose was collapsible.


I brought out the soaker hose, took the end of to make sure all the debris was out of it.  You tend to ignore an area that is automatically watered.  Last week, I found a bee had gotten in the hose and stopped it up, so be sure to check on them from time to time.

Clearing the soaker hose.

Next I put the soaker hose in place with sod staples.

Ran them on either side of the rose bushes and sod stapled the soaker hose to hit the roots


Sod staples...

So that was my quick and dirty tutorial but you will love water timers once you get used to them.

Mexican Heather...Highly Recommended and Often Overlooked

 Mexican Heather is a plant I doubt I would have given any consideration while shopping in a nursery.  It isn't showy really.  My mother bought me some last may to go around a fountain.
There was this old tree stump around the pool that I planted wild flowers around and it looked unkept.
So, I put a fountain on the old tree stump and my mother prompting me to remove the wildflowers (I don't think she cares for wildflowers) We planted Mexican Heather and Moss Roses.  Here there are six Mexican Heathers around this fountain.  This was taken in May 2012.

She also planted Mexican Heather in this bed between the azaleas.  There are perwinkle in front of the bushes.  Also, taken in May 2012.

Mexican Heather grows very fast. It makes a great border plant but they can easily crowd.  Let me show you how fast it grew. 
This was taken in July 2012.
September 2012.  Remember above you couldn't see them? Now there seemingly too many.  The moss roses were crowded out.

The bees love, love, love Mexican heather.  They are always in bloom and make a wonderful border plant.  There are a few things that surprise me about what people like in my garden.  They always remark upon... Chinese lanterns, iceberg roses, and the Mexican heather.  


So I am planting them as a border to my back rose garden.  Now, in this zone it is marked as an annual...but I think that term is very loose.  They do not like the cold but what seems to happen is that the tops will burn. I leave the tops on to protect the plant.  Also, because the bees LOVE them so much, they have lots of babies.  They work really, really well around porches, under fountains...just a great border plant.

Here is some that I planted too early and got burned.  I cut the top off.

I know hard to see but the tops are dried and the bottom leaves are still there.


Here are some I planted after I thought the fear of frost was over and got surprised.  Tops are a little burned but still going strong.  They may be considered an annual but I consider them almost a perennial.

Planting them between the sky pencils.

Last fall, I removed all the Mexican Heather from the front bed because they were crowding the azaleas.  But there were babies left.  I left them because I like the plants but the seeming small ones we plant overtook the bed.  See them in the back in the above picture.

I need to weed the bed again obviously but they are all over it.


So here is the new ones I bought from Lowes with a left over gift card.


This is residual babies around the porch.
So next time you are at the nursery, give them some consideration.  They aren't showy..per se but they are a great plant.

Lagniappe

Meanwhile back at the ranch...


While at Lowe's I, also, saw this.  I thought this might be an easy remedy to the butterfly garden next door until we can get the resources to do something more formal.  I bought a wildflower mix last year like this and it got huge.  Let me show you.  

 These wildflowers are very heat tolerant and seems to grow on concrete.  These are over  9 feet tall.  This is a similar mix, it was a Pennington Cottage Wildflower mix.
Electron rose...opens fast


Tiffany rose

Gold Medal

Tangerine Streams

Iceberg climber

Mr. Lincoln

Summer Snow

Double Delight

Double Delight

I think this is Eclipse.. don't have it listed on the rose map

Close up

Green Ice

Pinata

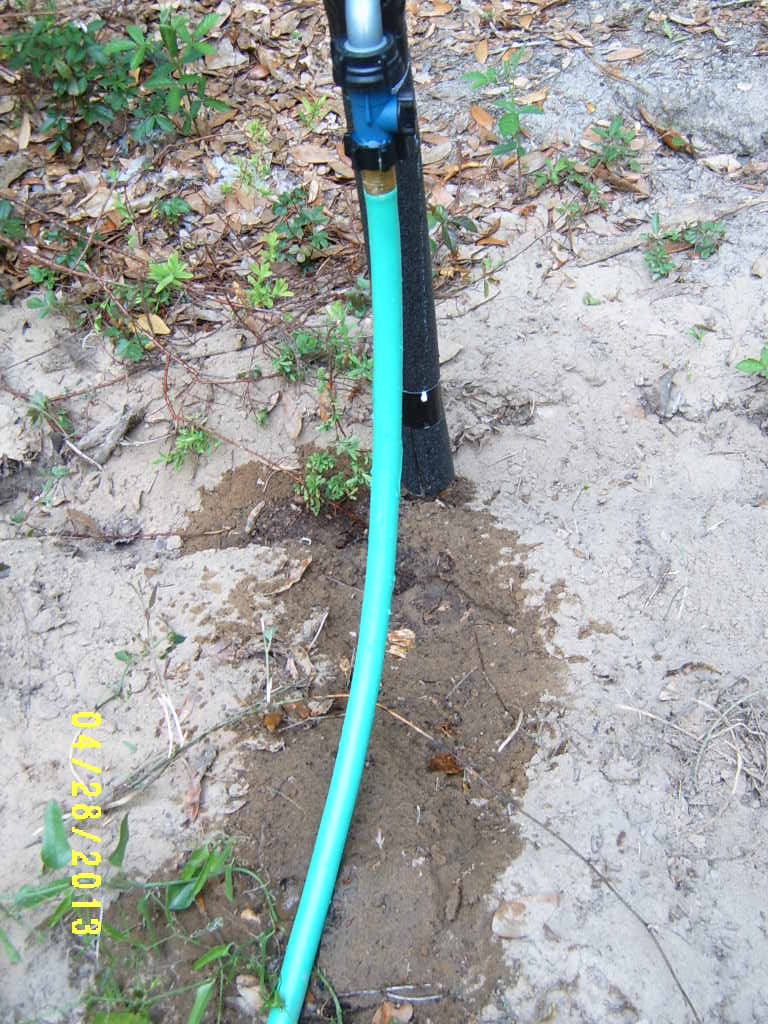
Roses along the drive that I will be irrigating...will show how to do a simple automated irrigation system in a future post.

Paradise

Another Paradise rose

Climbing Golden showers having a strong Spring flush.  I have learned with climbers you want the canes to go horizontal.


Don Juan

Impatient

They are in bloom

Residual wildflowers from last seasons wildflower mix

Indian blanketflower that was left over from last year


My bearded iris is finally blooming.

Daffodils

These are the roses that I am taking care of at the museum.
This was taken a couple of weeks earlier.  They are really taking off.


Daisies they have bordering them.  I have not been tending to these.

You want to talk about an EXTREMELY fragrant rose.  You can smell them long before you approach them.

Stormy Weather Rose

I zip tied the canes to the fence horizontally.  If you do this you will have a LOT more blooms.  If they go vertical you will just have blooms at the top of the canes.  Going horizontal makes several blooms...You want to go horizontal on climbers.  This is something I recently learned from Nell.

Wildflowers that I didn't plant.

The property is covered, and I mean covered in blackberries.


Driveway...for my reference

Flowers along the drive approaching the creek.


Sorry for the long post but I had a lot of pictures in my camera before the mishap the day before delayed what I wanted to do.